Calligraphy is more than just “pretty handwriting.” It is an art form, a stress-reliever, and for many people, a new creative career.
Whether you admire elegant Arabic calligraphy masterpieces or love modern brush lettering seen on social media, learning calligraphy is one of the most satisfying skills you can develop.
But here’s the real problem most beginners face:
“I don’t know where to start.”
Should you buy expensive pens? Learn Arabic or English calligraphy first? Start with strokes or letters? What paper is best?
If these are your questions, don’t worry—every beginner feels this way. The good news is that calligraphy is a skill anyone can learn, even if your handwriting is not good. You need guidance, patience, and the right steps.
This blog will give you a clear roadmap on how to start calligraphy as a complete beginner, along with a helpful child topic, solutions to common beginner problems, and answers to highly searched queries.
Why Start Calligraphy? (And Why Beginners Love It)
Calligraphy is not just a hobby—it’s a therapeutic activity and a valuable skill. Many people start calligraphy because it helps them:
- Reduce stress and increase mindfulness
- Improve focus
- Explore creativity
- Create personalized gifts, cards, and home décor
- Build a freelancing career in lettering, logo design, or invitation design
- Connect deeply with cultural and artistic roots (especially Arabic calligraphy)
If you feel drawn to it, trust your instinct—calligraphy is a beautiful journey.
The Main Problem Beginners Face
Most people who want to learn calligraphy think they must:
- Buy expensive pens
- Already have good handwriting
- Join a professional course before starting
- Spend hours practicing perfect lettering
This belief makes them frustrated and unmotivated.
The Solution:
Calligraphy begins with simple, slow strokes, not fancy equipment. You’ll improve naturally when you follow the right steps.
Let’s break down those steps one by one.
Step-by-Step Guide: How to Start Calligraphy as a Beginner
1. Choose Your Style of Calligraphy
(Calligraphy Style Selection – NLP Keyword)
Before you buy any tools, decide which style you want to learn first. The most popular ones include:
English Calligraphy Styles
- Modern Brush Calligraphy – Popular on Instagram & YouTube
- Copperplate – Elegant, wedding-style lettering
- Italic Calligraphy – Slanted and traditional
- Gothic / Blackletter – Bold medieval-style writing
Arabic Calligraphy Styles
- Naskh – Clean and easy for beginners
- Thuluth – Curvy and artistic
- Diwani – Decorative and flowing
- Kufi – Geometric and structured
Tip: If you’re a complete beginner, start with Modern Brush Calligraphy (English) or Naskh (Arabic). These styles are beginner-friendly and require fewer tools.
2. Gather Simple, Beginner-Friendly Tools
(Calligraphy Tools for Beginners – SERP Keyword)
Many people waste money on expensive kits. You don’t need them. Here’s the budget-friendly starter kit:
For Brush Calligraphy
- 1 small brush pen (Tombow Fudenosuke or any soft-tip pen)
- Smooth paper (printer paper is fine for practice)
- Pencil + eraser
For Dip Pen Calligraphy
- One straight nib holder
- Nikko G or Zebra G nib
- Calligraphy ink (water-based)
- Smooth paper or practice sheets
For Arabic Calligraphy
- Qalam (reed pen) or bamboo pen
- Black calligraphy ink
- Calligraphy paper or standard cartridge sheet
You can always upgrade later. Start simple and build confidence first.
3. Learn Basic Strokes Before Writing Letters
(Calligraphy Practice Strokes – NLP Keyword)
One of the biggest mistakes beginners make is jumping directly to writing letters. Calligraphy is built on strokes, not handwriting. Master these basic strokes first:
- Thin upstrokes
- Thick downstrokes
- Oval shapes
- Underturns
- Overturns
- Loops
- Curves and connectors
Practicing these for 10 minutes a day dramatically improves your calligraphy.
Why this works:
Calligraphy is about pen pressure control—light pressure for thin strokes, heavy pressure for thick strokes.
4. Start Writing Lowercase Letters
(How to Write Calligraphy Letters – SERP Query)
Once your strokes look consistent, start practicing lowercase letters in small groups:
Group 1 – The “entry stroke” letters
i, l, t, u, w
Group 2 – Oval-based letters
a, o, d, g, q
Group 3 – Loop letters
h, k, f, b
Group 4 – Challenging letters
s, r, e
Don’t rush. Go slowly and practice each letter several times.
5. Move to Uppercase Letters
Uppercase letters generally require more control and style, so don’t feel discouraged if they take longer to learn.
Start with simple ones like:
C, L, T, I
Then progress to decorative styles.
6. Learn Letter Connections
(Calligraphy Letter Connections – NLP Keyword)
To form words beautifully, you must understand how letters join. This is where beginners struggle the most.
Solution:
Practice common combinations like:
- “th”
- “an”
- “oo”
- “br”
- “fl”
When your letters connect smoothly, your words start looking professional.
7. Practice Short Words
(How to Write Calligraphy Words – SERP Query)
Start with simple, smooth-flowing words:
- love
- peace
- smile
- happy
- dream
Because these have smooth letters, they’re easier to work with and help build confidence.
8. Build a Practice Routine
(Calligraphy Practice Routine – High Search Keyword)
To improve steadily, follow this weekly routine:
- 10 minutes daily: Strokes
- 20 minutes: Letters
- 20 minutes: Words
- 1 day per week: Freestyle practice on quotes
Consistency matters more than long practice sessions.
How to Start Arabic Calligraphy for Beginners

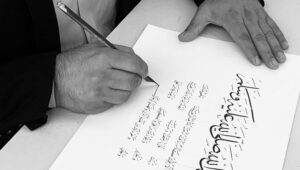
Arabic calligraphy is one of the most respected art forms in the Middle East—and especially admired in Dubai.
It carries deep cultural significance, spiritual beauty, and artistic elegance. If you’re a beginner who wants to learn Arabic calligraphy but doesn’t know where to start, this step-by-step guide will help you begin with clarity and confidence.
1. Start with the Naskh Style (Perfect for Beginners)
Among all Arabic calligraphy styles, Naskh is considered the easiest and most beginner-friendly.
Why?
-
It has clean, simple shapes
-
The letters are easy to read
-
The strokes are straightforward
-
It builds a strong foundation for advanced styles like Thuluth or Diwani
If you’re learning Arabic calligraphy for the first time, begin with Naskh. It will help you understand proportions, angles, and structure before moving to more complex forms.
2. Gather Your Beginner Tools (Simple, Affordable & Essential)
You don’t need expensive tools to start. A basic Arabic calligraphy kit includes:
✔ Qalam (Reed Pen)
A natural bamboo or reed pen cut at a 45-degree angle.
This angle creates the traditional thick and thin line variations.
✔ Ink (Smooth, Flowing Calligraphy Ink)
Use black calligraphy ink that flows smoothly and dries quickly. Avoid regular pen ink—it does not give proper stroke thickness.
✔ Paper (A4 Calligraphy Paper)
Use thick, smooth paper or cartridge sheets to prevent ink bleed.
✔ Ruler
Essential for drawing guidelines because Arabic calligraphy is based on proportions, not freehand writing.
3. Learn the Key Concepts Before Writing Letters
Arabic calligraphy is based on rules and geometry. Understanding these basics will help you write beautiful, consistent letters.
a. Master the Alif Stroke (حرف الألف)
The Alif is the foundation of Arabic calligraphy.
If your Alif is beautiful, your entire script will improve.
b. Thickness Control
This refers to controlling pressure and angle to create:
-
Thick downward strokes
-
Thin upward strokes
This contrast is what makes Arabic calligraphy elegant.
c. Qalam Angle Management
Your qalam should maintain the same angle throughout writing.
Changing the angle changes the shape and thickness of the letters.
d. Understanding Dot-Based Proportions (نقطة)
Arabic calligraphy uses “dots” as measurement units.
For example:
-
The height of an Alif = 7 dots
-
The width of certain curves = 2–3 dots
This ensures every letter follows a strict structure.
4. Practice Letters in the Correct Order
To build confidence and muscle memory, always practice Arabic letters in groups. This is the natural learning sequence followed by professional calligraphy Artists:
Group 1: Vertical & Straight Letters
ا ل ك
These letters help you learn straight strokes and qalam control.
Group 2: Basic Curve Letters
ب ت ث ن ي
These teach you how to create smooth curves and consistent dots.
Group 3: Circular & Semi-Circular Shapes
ج ح خ
These letters introduce inner loops and depth.
Group 4: Short Curve Letters
ر ز
Perfect for practicing short, elegant curves.
Group 5: Wave & Double Curve Letters
س ش
These help you practice rhythm and flow.
Group 6: Strong Bold Letters
ص ض
Develops control over heavier strokes.
Group 7: Tall Structured Letters
ط ظ
Requires careful alignment with dot proportions.
Group 8: Complex Curved Letters
ع غ
Trains you in long curves and decorative strokes.
Group 9: Full Curve + Dot Letters
ف ق
Teaches circular balance and proportion.
Group 10: Medium & Hollow Shape Letters
م هـ
Practices bowl shapes and internal spacing.
Group 11: Ending Curve Letter
و
Introduces final flourishes and curved terminations.
5. Practice with Patience and Follow the Rules
Arabic calligraphy is not about speed—it’s about discipline, rhythm, and consistency. When you start:
-
Go slow
-
Maintain qalam angle
-
Follow dot proportions
-
Rewrite each letter multiple times
-
Compare your strokes with reference sheets
Over time, you’ll notice your letters become more elegant, balanced, and proportional.
Common Problems Beginners Face (With Solutions)
1. “My strokes look shaky.”
This is one of the most common issues for beginners. Shaky strokes usually happen when you try to write too fast or hold the pen too tightly. Calligraphy isn’t meant to be rushed—it’s slow, controlled writing.
Solution: Take your time. Focus on steady movements and practice basic strokes slowly. With consistency, your hand will naturally become more stable.
2. “My letters don’t match in size.”
Uneven letters make your words look messy, and this can be frustrating for beginners.
Solution: Use guideline sheets or printable templates. These help maintain consistent height, spacing, and proportions, making your writing look cleaner and more professional.
3. “Ink smudges or bleeds.”
This usually happens due to low-quality paper or too much pressure.
Solution: Use smooth, bleed-proof paper—ideally 100gsm or higher. It absorbs ink properly and prevents smudges.
4. “I get tired quickly.”
Calligraphy uses muscles you don’t normally engage, so fatigue is normal.
Solution: Take short breaks every 20 minutes. Stretch your fingers and relax your wrist to maintain comfort and improve control.
Final Thoughts: Start Simple, Enjoy the Journey
Learning calligraphy is a journey of patience, creativity, and self-expression. Whether you’re starting calligraphy for fun, personal projects, or future freelancing opportunities, the key is to begin with the basics and stay consistent.
- You don’t need perfect handwriting.
- You don’t need expensive tools.
- You need passion + practice.
At CalliDubai.com, we help you explore the world of elegant writing—one stroke at a time.
FAQs (Based on Highly Searched Queries)
1. Can I learn calligraphy if my handwriting is bad?
Yes! Calligraphy is about technique, not handwriting style.
2. What is the easiest style of calligraphy to start with?
Modern brush calligraphy and Naskh Arabic calligraphy are the easiest.
3. How long does it take to learn calligraphy?
With daily practice, you’ll see improvement in 30 days.
4. Do I need expensive tools to start?
Not at all—a basic pen and paper are enough for beginners.
5. Is calligraphy good for stress relief?
Yes, it’s one of the most calming creative hobbies.